When I say I cook for my family....I cook for ALL my family - including my dogs. In honor of my dog Rookie's birthday, I decided to make some homemade dog treats to show her my love. For all those dog lovers out there, you know food is a major win with our furry friends. And here's the best part - humans can eat 'em too! You can feast with your fur baby!


This recipe is so easy and doable at any time. Whether you want to treat your dog, celebrate good behavior, or give 'em a little birthday gift - this recipe will make for some very happy pups.
Jump to:
Ingredients Overview
- bacon strips
- all-purpose flour
- egg
- creamy peanut butter
- chicken broth
*See recipe card for quantities*
Instructions Overview
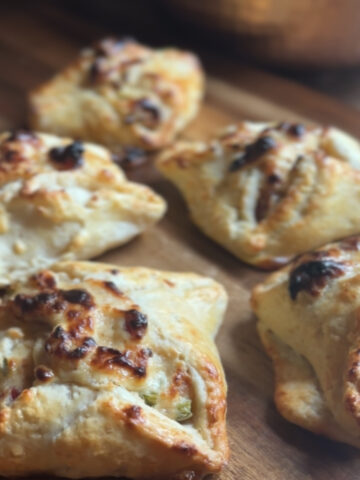
Here's what the process will look like!

Prepare your bacon bits!

Prepare your cookie dough.

Craft the dog treats with bacon bits and dough. Place in oven at 350 Fahrenheit for 10 minutes.

Watch your baby's face light up and try not to lose a finger!
Hint: let the cookies cool before feeding to your pups! You don't want to burn their mouths.
Substitutions
- Gluten Free - use gluten free flour instead of all-purpose flour to make this gluten free. Ratio is generally 1:1.
- Vegetarian - can be made without bacon. Just follow the recipe solely with peanut butter.
- Nuts - if allergic to peanuts or nuts in general, do not use peanut butter or any nut butter. For the dog's wellness - do not substitute peanut butter with any other nut butter as dogs can be allergic to certain types of nuts.
Equipment
- 1 Cast Iron Skillet Pan - suggested size is 10¼-10⅝"
- 1 Large Mixing Bowl
- 1 Cutting Board
- 1 Knife
You can find some of my favorite equipment here if you need any guidance!

Rookie's Cookies Homemade Dog Treats
Equipment
- 1 Cast Iron Skillet Pan suggested size is 10¼-10⅝"
- 1 Large Mixing Bowl
- 1 Cutting Board
- 1 Knife good for chopping!
Ingredients
- 4 strips bacon cut into halves to fit in pan
- 2 cups all-purpose flour
- 1 large egg
- 1 cup creamy peanut butter
- 1 cup chicken broth
Instructions
- Place your strips of bacon into your cast iron skillet pan and turn on stove to medium heat. Let the strips fry in their own grease while you work on the dough.
- In a large mixing bowl, combine your flour, egg, peanut butter, and bone broth. Mix well and cover. Put in the fridge for 30 minutes and return to your bacon.
- Once bacon is thoroughly cooked, remove from cast iron pan and place on cutting board. Chop the strips into small bite-size pieces. Set aside while you wait for the dough to finish chilling.
- Once the dough has been in the fridge for 30 minutes, remove and place on kitchen counter. Line your baking sheet with parchment paper and grab the dough and bacon bits.
- To make the treats, grab a palms worth of the dough, roll around in your hand until you made a ball, then flatten it out. Make a little taco shell shape and add a few bacon bit pieces in the middle. Then close the edges so the bacon is well enclosed in the dough. Roll into a ball shape.
- With remaining bacon bits, gently press into the top of your balls any additional bacon bits to top off the treat.
- Place treats in the oven at 350℉ for about 10 minutes.
- Remove and let cool - then treat your doggo!
Video
Storage
- Cooling: Allow the homemade dog treats to cool completely after baking before storing them. Placing them in a single layer on a wire rack will help them cool evenly.
- Air-tight Container: Once cooled, transfer the dog treats to an airtight container. Glass or plastic containers with tight-fitting lids work well. Make sure the container is clean and dry before adding the treats.
- Refrigeration: Due to the perishable nature of the ingredients (especially bacon), it's recommended to store homemade dog treats with bacon and peanut butter in the refrigerator. This helps to prolong their shelf life and prevents them from spoiling too quickly.
- Layering: If you need to stack the treats in the container, consider placing parchment paper or wax paper between layers to prevent them from sticking together.
- Freezing: If you've made a large batch of dog treats or want to store them for an extended period, you can freeze them. Place the cooled treats in a single layer on a baking sheet and freeze until solid. Once frozen, transfer them to a freezer-safe bag or container. Frozen homemade dog treats can typically last for several months.
- Thawing: When you're ready to give your pup a treat, simply remove the desired amount from the refrigerator or freezer and allow them to thaw at room temperature. Avoid microwaving the treats, as this can cause them to become too hot and potentially burn your dog's mouth.
Top Tip & Disclaimer
Always be mindful of your dog's specific diet! My dogs are able to consume peanut butter and bacon without stomach issues, but always consult your vet first if your dog has a sensitive stomach or allergies to certain foods!
FAQ
Yes! There's nothing in this recipe that cannot be consumed by humans. You can snack alongside your doggo!
If you're a human allergic to peanuts, you can a nut-free butter alternative like tahini, sunflower, soy not, granola butter, etc.
For your dog, remove the peanut butter altogether and do not substitute with another nut alternative as it can be toxic to dogs.
Food safety
- Cook to a minimum temperature of 165 °F (74 °C)
- Do not use the same utensils on cooked food, that previously touched raw meat
- Wash hands after touching raw meat
- Don't leave food sitting out at room temperature for extended periods
- Never leave cooking food unattended
- Use oils with high smoking point to avoid harmful compounds
- Always have good ventilation when using a gas stove


beauty tips
Hello There. I found your blog the use of msn. That is a very
smartly written article. I'll be sure to bookmark it and come back to read
more of your helpful info. Thanks for the post. I will certainly comeback.