Embrace the art of bread making with this Dutch Oven Bread Loaf recipe, delivering homemade perfection. This easy-to-follow guide unlocks the secrets to a crusty, flavorful loaf that's as delicious as it is beautiful.
Elevate your baking game and savor the joy of freshly baked goodness! This one is bound to impress.
Substitutions
- Yeast - When choosing the type of yeast for your baking, follow the recipe's instructions, as the type of yeast can affect rising times and flavor. You can often substitute one type of yeast for another, but you may need to adjust rising times or quantities slightly. If a recipe calls for active dry yeast and you want to use instant/fast-rising yeast instead, you can typically use about 25% less fast-rising yeast and reduce the rising time by about 10-15 minutes. To learn more about the various types of yeasts, please see question 1 in the FAQ section.
- Gluten Free - Making a gluten-free Dutch oven bread loaf can be a bit different from making traditional wheat-based bread due to the absence of gluten, which provides structure and elasticity to bread. But, it's still possible to create a delicious gluten-free loaf with a good crust using alternative flours.
- Make sure you find a gluten-free flour blend suitable for bread. The flour ratio is usually 1:1 with normal flour but use the recommended ratio on the gluten-free flour packaging.
- I'd also suggest adding 1-1.5 cups worth of a complimentary gluten-free nut flour blend (like almond or coconut flour) to add structure and flavor to your loaf.
- Gluten acts as a natural binder in wheat-based bread, so in gluten-free bread, you might need to add binding agents like xanthan gum or guar gum to help with texture and structure. Typically, you'll use ½ to 1 teaspoon of xanthan gum per cup of gluten-free flour.
- Gluten-free flours absorb moisture differently than wheat flour. You may need to adjust the liquid-to-dry ingredient ratio to achieve the right dough consistency. Start with the recipe's recommended ratio and add more liquid if the dough is dry.

Dutch Oven Bread Loaf Recipe
Can you imagine me showing up at your house with this loaf of bread?!
Equipment
- 1 Dutch Oven 5 Quart
Ingredients
- 3 cups all purpose flour
- 2 teaspoons activated yeast
- 2 teaspoons salt
- 12 oz of water
- Optional: Aerosmith soundtrack
Instructions
- In a large mixing bowl, combine the all-purpose flour, salt, and activated yeast.
- Add in the warm water. Mix everything together until a shaggy dough forms. You can use a wooden spoon or your hands for this step.NOTE: If you want to be sure your yeast is activated, add the activated yeast to the warm water separately from the dry ingredients first. Let it sit for about 5-10 minutes until it becomes frothy. This indicates that the yeast is active and ready to use. Then you can mix with the other dry ingredients.
- Once the dough comes together, cover the bowl with a clean kitchen towel or plastic wrap and let it rest in a warm place for about 2-3 hours, or until the dough has doubled in size.
- Gently punch down the dough to release any air bubbles.
- Preheat your conventional oven to 450°F (232°C) and place a Dutch oven with a lid into the conventional oven while it's preheating.
- On a flat flour-covered surface, shape the dough into a round or oval shape depending on your preference. Use flour on your hands generously to get the shape you want without it sticking to you.
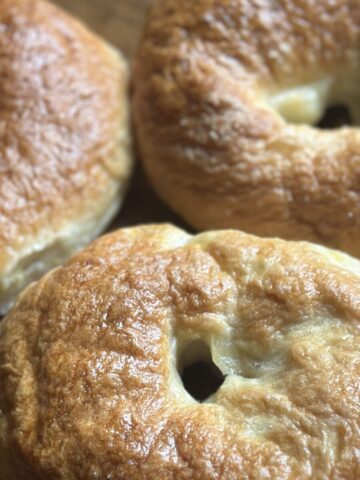
- Time to get crafty! Carve a little slit into the dough along the side to give it the crevaces that you can see in my photo.
- Once the oven is preheated, carefully remove the hot Dutch oven (use oven mitts). Place the dough onto a piece of parchment paper and then place the parchment paper with the dough into the Dutch oven.
- Put the lid back on the Dutch oven and bake for 30 minutes in conventional oven.
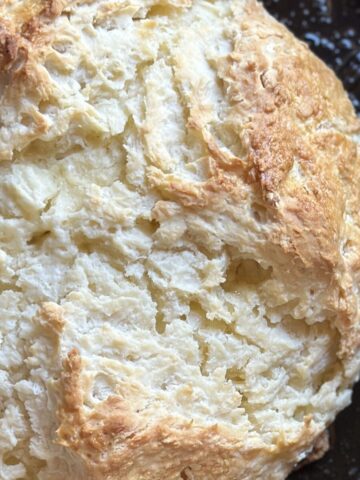
- After 30 minutes, remove the lid and continue baking for an additional 10-15 minutes, or until the bread is golden brown and sounds hollow when tapped on the bottom.
- Carefully remove the bread from the Dutch oven using the parchment paper as a handle.
- Allow the bread to cool on a wire rack before slicing and serving.
- Go show off your loaf ya'll!
Video
FAQ
- What are the differences between the various types of yeasts? There are several types of yeast that can be used in baking, each with its characteristics and applications. Here are the most common types of yeast used in baking:
- Active Dry Yeast:
- Active dry yeast is one of the most widely used types of yeast in baking. It needs to be dissolved in warm water before using.
- It has a slightly longer activation time compared to instant yeast but can be used in a wide range of recipes, including bread, rolls, and pizza dough.
- It has a longer shelf life when stored in a cool, dry place.
- Instant Yeast (Fast-Rising Yeast):
- Instant yeast, also known as fast-rising yeast or quick-rise yeast, doesn't require proofing in warm water.
- It can be added directly to the dry ingredients in a recipe, which can save time in the baking process.
- It activates quickly and is suitable for bread, rolls, pizza dough, and many other baked goods.
- Fresh Yeast (Cake Yeast or Compressed Yeast):
- Fresh yeast is a moist yeast that comes in the form of a cake or block.
- It requires refrigeration and has a shorter shelf life compared to dry yeasts.
- Fresh yeast is less commonly used by home bakers but is sometimes preferred in commercial baking for its unique flavor contributions.
- Sourdough Starter (Wild Yeast):
- Sourdough starter is a mixture of flour and water that captures wild yeast from the environment.
- It's used to make sourdough bread and other sourdough-based products.
- Sourdough starter requires regular feeding and maintenance and can develop complex flavors over time.
- Brewer's Yeast and Nutritional Yeast:
- Brewer's yeast and nutritional yeast are not typically used for leavening but are used for their nutritional benefits and flavor.
- Brewer's yeast is often used as a supplement and has a slightly bitter taste.
- Nutritional yeast has a savory, cheesy flavor and is commonly used as a topping or seasoning for dishes like popcorn and vegan cheese substitutes.
- Do you need to activate the yeast separately before adding into other dry ingredients? Normally yes you would, but in this recipe I was able to mix all the dry ingredients together, add the warm water, mix, cover, rest, and still have this beautiful loaf. So you don't need wait for any frothing of the yeast. If you want to be sure your yeast is active though, I suggest adding it straight to the warm water separately prior to adding to remaining dry ingredients.
Storage
To store a freshly baked Dutch oven loaf and keep it fresh for as long as possible, follow these steps:
- Cool Completely: Allow the Dutch oven loaf to cool completely at room temperature before storing it. This usually takes 1-2 hours. Cooling is essential to prevent condensation inside the storage container, which can make the crust soggy.
- Wrap or Cover: Once the bread has cooled, you have a few options for storing it:
- Bread Bag: Place the bread in a bread bag or a clean, breathable cloth bag designed for storing bread. Avoid using plastic bags as they can trap moisture and make the crust soft.
- Paper Bag: Wrapping the bread in a paper bag or using a paper towel to cover it can also help maintain the crust's texture. This method is suitable for short-term storage.
- Bread Box: If you have a bread box with good ventilation, you can store the loaf in it. Bread boxes are designed to keep bread fresh by maintaining the right level of humidity.
- Cotton Towel: You can wrap the bread in a clean cotton kitchen towel and secure it with a rubber band or twine. This method can help preserve the crust.
- Store at Room Temperature: Keep the wrapped or covered bread at room temperature in a cool, dry place, away from direct sunlight, heat sources, and moisture. I usually put in a Ziplock bag and set on my kitchen countertop. Avoid storing it in the refrigerator, as it can accelerate staling.
- Use within a Few Days: Dutch oven bread is best when consumed within 2-3 days of baking for the freshest taste and texture. As time passes, the bread may become slightly less crisp on the outside, but it should still be delicious.
- Reheat as Needed: If you want to refresh the bread or enjoy it warm, you can reheat individual slices or the entire loaf in a preheated oven at 350°F (175°C) for about 10 minutes. This can help revive the crust and make the bread taste freshly baked.
You can store a Dutch oven loaf in the freezer for up to 2-3 months if properly wrapped and stored.
- Cool Completely: Allow the baked Dutch oven loaf to cool completely at room temperature before freezing. If you freeze it while still warm, it can create condensation inside the packaging, which may affect the texture of the bread.
- Wrap Tightly: Wrap the bread tightly to prevent freezer burn and moisture loss. You have a few options:
- Double-wrap the loaf in plastic wrap. Ensure it's sealed tightly to minimize air exposure.
- Place the wrapped loaf in a heavy-duty freezer bag and remove as much air as possible before sealing.
- Use aluminum foil to wrap the bread tightly.
- Store in Freezer: Place the wrapped and labeled Dutch oven loaf in the coldest part of your freezer to maintain its quality.
- Thawing: When you're ready to enjoy the bread, remove it from the freezer and let it thaw at room temperature. This may take a few hours to several hours, depending on the size of the loaf. You can also reheat slices or the entire loaf in the oven for a few minutes to freshen it up.


Nicole
Delicious and super easy!!
Elida Ratto
Thank you for sharing us ❤️
Laura
This turned out truly wonderful. Thank you!! What is the best way to store fresh bread?
lilyloutay
I usually put in a ziplock bag and leave on the counter. Usually lasts about 1-2 weeks!
Karin
🤣🤣🤣 OK, that's funny. Mine doesn't last until morning with my boys! I enjoy baking bread, but this is a game changer. So easy and delicious! Thank you!!
Kelly Togerson
What size Dutch oven did you use? 3 quart? 5 quart or 7?
Thank you!
lilyloutay
I used a 5 quart!
Beth
Hello, love you and your recipes! Do you think I could use bread flour instead of all purpose?
lilyloutay
You can! I personally don't use bread flour so I'm not sure if the ratios are going to be 1:1. But bread flour has more protein which could result in a dough that's dry, so you may need to add a little bit of water.
Val
Can it proof for longer without messing up?
lilyloutay
It really depends how much longer. The window I suggested is the prime window for proofing. Overproofing for too long can make the bread lose shape and flat when baking.
Lindsey
I'm trying this tomorrow and am so excited! I have fast rising instant yeast. Is that ok to use? Is it activated, like the recipe says? I'm new to this bread making gig and have no idea about yeast lol
lilyloutay
Fast Rising Yeast is totally ok to use but please note the differences:
Activation: Active dry yeast needs to be dissolved in warm water (typically between 105°F to 115°F or 40°C to 46°C) before it is used in a recipe. This process is called "proofing" and allows the yeast to activate and become active for fermentation.
Instant Yeast (Fast-Rising Yeast): Fast-rising yeast, also known as instant yeast or quick-rise yeast, does not require proofing in warm water. It can be added directly to the dry ingredients in a recipe. This yeast activates more quickly and can help dough rise faster compared to active dry yeast.
Rising Time: Because fast-rising yeast activates more quickly, it can lead to shorter rising times in recipes compared to active dry yeast. This can be beneficial when you want to speed up the baking process.
Substitution: In most recipes, you can substitute fast-rising yeast for active dry yeast, but you'll need to adjust the timing. You may need to reduce the rising time when using fast-rising yeast.
It's essential to follow the specific instructions in your recipe and use the type of yeast called for. If a recipe calls for active dry yeast and you want to use fast-rising yeast instead, you can typically use about 25% less fast-rising yeast and reduce the rising time by about 10-15 minutes.
Cary Hogan
How long do you have to let it rise if using fast rising yeast?
lilyloutay
Fast-rising yeast does not require proofing in warm water. It can be added directly to the dry ingredients in a recipe. This yeast activates more quickly and can help dough rise faster compared to active dry yeast. Because fast-rising yeast activates more quickly, it can lead to shorter rising times in recipes compared to active dry yeast. That being said, if the recipe calls for active dry yeast and you want to use fast-rising yeast instead, you can typically use about 25% less fast-rising yeast and reduce the rising time by about 10-15 minutes.
Julie
I’ve never made bread before, but I was inspired by Hannah’s charm and the simplicity of the recipe, I baked a loaf last night and it turned out amazing! It was so easy and the flavor and texture are perfect. It’s a nice light loaf with a crispy beautiful crust. I can see this definitely becoming a staple in our house, it’s been less than 24 hours and it’s nearly gone already ❤️If baking is intimidating to you, try this recipe and you will not regret it!
Carson Moore
So would you use active dry yeast and put it straight into the ingredients? Or would you activate it in warm water first and then use 2 teaspoons of that to put into your recipe?
lilyloutay
You would mix it with a couple other ingredients (see step 1) and then add warm water and let it sit. But the other ingredients are all dry ingredients so the yeast isn't combining with anything else yet before you put in the water.
Lisa
I'm giving this a second try tonight! This time I'll be sure to knead it since I didn't the first go around (I'd never baked bread before). One question about the yeast- you say in the recipe and again in your reply to add all dry ingredients together then add the warm water..but how can you see it frothy once the yeast is activated with all of the other ingredients? Mine didn't show any frothy. Is it going to flop?
lilyloutay
You might not see it froth, but it should still turn out just fine. The frothing process is just to make sure your yeast is activated. But what you did, mixing all the dry ingredients and adding water (which is how I did it) worked!
Angie Bethany
Lmao@ Aerosmith on the recipe ❤️
María José Pérez
Hi! English isn't my first language, so excuse me if i butcher something or my grammar ain't right. If i don't own a Dutch oven, do you think i can use the recipe in a bread pan?
lilyloutay
This particular recipe needs a dutch oven so it cooks 360 degrees and gets a crunchy round outside! If you have a bread pan, I suggest resorting to my Homemade Sandwich Bread recipe!
LaDwana
I made this bread and it was great. I am wondering can I use the same recipe and add olives?
lilyloutay
yes!
Katrina Ray
Made this last night and it was gone this morning! Big hit!
Alice in SD
AEROSMITH PLAYING...HEHHEEH. SECRET INGREDIENT. HEHHEHE. <33. GO LILLY
D M
Specific size Dutch oven? I have two. A giant oval one (seems too large) and one that is 2-3 quarts. Wpuld the smaller one work or would the bread expand too much?
lilyloutay
I would use the larger one. Worst comes to worst the bread takes a little longer but the smaller one wouldn't do the loaf justice!
Karen
Would this work with a gluten free flour?
lilyloutay
It should! Go ahead and try and let me know! Sometimes on the bags of gluten free flour, they'll say what ratios would work as a substitute to normal flour.
Sarah
This is the first recipe I've seen where you don't have to let it sit overnight. Can't wait to try!
Crystal Garcia
I don’t have a Dutch oven. 😬 is there something else I can use?
lilyloutay
This particular recipe needs a dutch oven so it cooks 360 degrees and gets a crunchy round outside! If you have a bread pan, I suggest resorting to my Homemade Sandwich Bread recipe!
Sarah
How long do you kneed the dough for? I've only ever made homemade bread once before and it was SO dense I think I messed up kneeding it. I want so bad to try this it looks absolutely delicious but I'm nervous it will turn out like a brick. Any tips? What consistency should I look for in the dough before setting it to rest/ rise. Do you kneed it before or after you let it rise?
lilyloutay
You want to knead it until all ingredients are completely combined and it looks the same across the entirety of the dough. I suggest stretching it and folding in then pushing down to knead over and over until you get the homogenous dough you want. Usually takes around 8-12 minutes.
Sarah
Thank you so much! I can't wait to give it a try!
Cathy
When do we knead it? I'm new to baking bread and the above recipe doesn't say to knead the dough, so I'm worried I messed this up.
lilyloutay
For this one, you don't really knead the dough but rather shape it. You fold the dough into itself once it's risen and then you shape it in the circle/oval shape with your hands.
Rachel
Love this! Are you supposed to kneed the dough after it rises too?
lilyloutay
You can knead it a little but mostly just to get a circular shape in place. You don't want to knead too much otherwise it could come out a little dry!
Kris
Can I use my kitchenaid to knead the bread?
lilyloutay
You can but make sure you use the specific dough hook attachment that is for kneading!
Tracey
Omg I just made freakin’ bread for the very first time!! So easy!!
Jessica Austin
Could I put the yeast in the water, let it bubble, and then add to the flour and salt mixture or would that not work? I tried a different recipe last night for Dutch oven bread and my loaf was flat, wondering what I may have done wrong. Thank you!
lilyloutay
You should be able to combine the dry ingredients, add the water, and then let sit for 5-10 minutes. You want to give the yeast time to activate. Then you can mix and combine everything. Did you also cover the bowl with the dough in it to let it rise for a few hours?
Giselle Knight
Sooo if everything got combined before letting it sit do I need to toss and start over? Asking for a friend.😆
lilyloutay
No! It should still turn out just fine.
Jenn Cruz
Hello!! To make sure I’m understanding, you’re activating the yeast by mixing with the flour and salt, then adding water and letting it sit - correct? Thanks!
Renee
Wondering samething. Following the directions so hope mine turns out!🤞🤞
lilyloutay
Correct!
Sandy Garrett
I haven’t made it yet but plan to. I love how you take the time to answer everyone’s questions. You are the nicest!
lilyloutay
Ya'll are part of the family now!
Monica
Hi! Going to attempt this today. Just to be sure this recipe is for just one loaf right?
lilyloutay
Correct!
Sammi
Girl! This turned out so well! It's so easy and absolutely delicious! I'm so happy I found you on Insta. You are pure joy! ❤️
Julie E. Patterson
I love your videos!!! Aerosmith 🤣
Can I make this without a Dutch Oven?
lilyloutay
This particular recipe needs a dutch oven so it cooks 360 degrees and gets a crunchy round outside! If you have a bread pan, I suggest resorting to my Homemade Sandwich Bread recipe!
Anika
The easiest beginners bread! So easy, so good. Hardest part is waiting for it to cool... I can't. But good luck to you should you try to resist the temptation!! This is a new staple in my house!
Angela
So perfect. So yummy. So easy.
Monica
Omg just made this bread, it is spectacular! Especially with delicious butter! 🤤
But I do have a question. How should it be stored? In an air tight container, wrapped in foil? Should it go in the fridge or sit on the counter?
How do you store your breads?
lilyloutay
I usually put in a ziplock bag and leave on the counter. Usually lasts about 1-2 weeks!
Jodie Peters
Can I use rapid yeast in this recipe? Have the lemon cake in the oven right now! Had a little late evening sweet tooth and thought, oh hell to the yeah I am making the lemon cake right now!! Hahahaha
lilyloutay
Yes you can!
Kim
Came out perfect!
Errin
Made for the first time today and my family loved it!! 💕
Heather
Made it, devoured it, making it again! Delicious & easy.
Gwendlyn
Would a 4 quart Dutch oven be too small for this?
lilyloutay
I used a 5 quart Dutch oven but the 4 quart may work. I would just keep an eye on it as its baking to make sure it looks alright!
Julie
I only have a 4qt and it worked great!
Pam
It was a success and so much that I got the "heel" (end piece)
because the family ate it like a swarm of locusts! Requests are in for more, more, more.
lilyloutay
LOVE to hear that!!
Sarah
Just made this with my 14 year old son so he can take on bread duty! So easy and so good.
Chelsey
I made this today… it was so easy and oh my word my house smells amazing and the bread is so delicious and moist!
Rachel
I need help! When you add the water to the flour and yeast combination, are you incorporating the two by mixing or do you just let the water sit on top so to speak?
lilyloutay
You mix and then let sit so the yeast can get activated and the dough will rise!
Michelle Brandt
Giiiirl, all you had to say is BREAD. Dang! Slap some fresh, homemade butta on it and heaven's gates open!
Your excitement and joy is contagious .... in a good way! 😉
Bethie
Fabulous! Thank you…., and of course, Aerosmith!
CJ VIzier
Thank You Lilyloutay !! This was the first bread I've ever made and it's all because you made it look so easy on IG! Your videos really inspire, and I love the way your hubby loves on you. So sweet. Wish you were a neighbor. I made this bread last night and put one of my compound butters on it ( homemade butter with sugar and cinnamon mixed into a ball ) and boom... I had a delicious treat this morning with my coffee. Girl... I'm a FAN! #SouthernWomen I'm gonna try all of the other recipes you have. Thank you!
Jess
I'm new to everything when it comes to making bread. I bought instant active yeast packets.... will it work in the recipe?
lilyloutay
Yes it should work! Just make sure you use the right measurements. Let me know how it turns out!
Georgina
I’m not sure what I did wrong 😩 my dough was so goopy and wouldn’t hold a shape at all when I tried to form it into a ball.
lilyloutay
Was your yeast expired at all?
Brenna
Best bread I’ve ever made! I messed up the recipe and mixed the dry ingredients with the water instead of letting it sit, and it still turned out perfect! This was so delicious and I will be making this weekly!
Jessica
Gave this a whirl with GF bread flour because, well, that’s all I had. I didn’t have parchment so I just sprayed my Dutch oven generously. Turned out darn good!! The GF bread flour made it a tiny bit chewy but my family (and a few bonus kids that were over) devoured it in one sitting. I’d like to try it with GF all purpose flour, but my husband said “don’t change a thing”. I have no idea how to post a photo but it turned out pretty.
lilyloutay
made my day!!! So glad you enjoyed!
Sadie Wittner
What brand of Dutch oven do you own? I am trying to find one I like and I love yours!
lilyloutay
I love my Lodge Dutch Oven.
KeshaB
My dough is going flat, can anyone tell me what I may be doing wrong? Putting dry ingredients together, adding water, mixing, let sit for 5-10, kneading and then sit for 2.5 hours. Maybe not kneading long enough?
lilyloutay
Is your yeast expired at all?
Kesha
The expiration date is 12/2025. I’m using the Fleischmann’s Active Dry yeast in the jar.
lilyloutay
And you covered the dough and let it rest in a warm place, or until the dough has doubled in size?
Kesha Brock
Yes, although I couldn’t have picked mine up and it stay together like yours does in the video. I cooked it, it was delicious, the bottom a little hard.
lilyloutay
Got it - when it's too gooey, try adding just a little bit a flour to thicken it up. Not too much, but just a little bit to hold it together. I'm glad it was delicious none-the-less! <3
Jen
If I use a 7 qt Dutch oven will it mess it up? I am sorry I am new to the bread life!
lilyloutay
No it should be fine! I would just recommend anything 5qt and over for this recipe
Jen
Thank you! Making some now.
Giselle Knight
I am attempting this recipe….right now. It was unclear from the video but once I pour the water into the dry ingredients was I supposed to mix everything or just leave it alone? If I was supposed to leave it alone and I mixed it instead do I need to start over? Haha 😆
lilyloutay
Not necessarily! You might not see the frothing happen but when you combine the ingredients and set the dough aside (covered), did it rise?
Michelle Baccus
Hey there. I am VERY new to baking and bread life. Want to jump on the sourdough train eventually……..your video makes this bread look amazing. Excited to give it a try. Question….there are so many versions of yeast. I am not sure what they do. Am I to use “instant dry yeast”, “bread machine instant yeast” or “active dry yeast” , and what is nutritional yeast for? Want to get it right 🙂 Love your videos they make me smile.
lilyloutay
The main differences for yeast are below:
Activation: Active dry yeast needs to be dissolved in warm water (typically between 105°F to 115°F or 40°C to 46°C) before it is used in a recipe. This process is called "proofing" and allows the yeast to activate and become active for fermentation.
Instant Yeast (Fast-Rising Yeast): Fast-rising yeast, also known as instant yeast or quick-rise yeast, does not require proofing in warm water. It can be added directly to the dry ingredients in a recipe. This yeast activates more quickly and can help dough rise faster compared to active dry yeast.
Rising Time: Because fast-rising yeast activates more quickly, it can lead to shorter rising times in recipes compared to active dry yeast. This can be beneficial when you want to speed up the baking process.
Substitution: In most recipes, you can substitute fast-rising yeast for active dry yeast, but you'll need to adjust the timing. You may need to reduce the rising time when using fast-rising yeast.
It's essential to follow the specific instructions in your recipe and use the type of yeast called for. If a recipe calls for active dry yeast and you want to use fast-rising yeast instead, you can typically use about 25% less fast-rising yeast and reduce the rising time by about 10-15 minutes.
Nutritional yeast has a savory, cheesy flavor and is commonly used as a topping or seasoning for dishes like popcorn and vegan cheese substitutes. It's not typically used for leavening but moreso for nutritional benefits and flavor.
All this being said - I suggest using active dry yeast for this recipe!
Denise
Perfect, easy, and yummy. Works up quick. I let mine proof in the (off) oven with the oven light on and it’s cozy and warm. House smells amazing now
Catherine
So when I add the water to step 1, I don’t mix it until after 5-10 min?
So excited to try this!
lilyloutay
When you add the water to step 1, you can mix together and just let the dough rise. If you want to make sure your yeast is activated, I suggest putting the yeast directly into your warm water and waiting 5-10 to let it froth. Then when it does, you can pour into the other dry ingredients and mix together.
Tami
Love this bread so much as did the whole family. The look on my son's face when I told him I made it. Priceless 😂. Do you think adding flavors to the recipe would change the way it comes out? I was going to try you're cheese bread recipe but wondered if I could add garlic salt and everglades to this instead. (Thinking the cheese wouldn't work.)
Heather
Omg this was the most amazing thing I have ever done!!! I have never made anything from scratch let alone activated yeast and your video and instructions were so easy to follow!! Please keep doing things like this I love them and want to keep trying more things!!!!
Ashley Ingraham
This has become a staple in our house! I was wondering if it can be done with whole wheat flour? And what about some add ins like oats or seeds?!
lilyloutay
Definitely can! The whole wheat is a bit denser will likely require a longer kneading time. May also require a longer rise time compared to all-purpose flour bread because the bran and germ in whole wheat flour can interfere with yeast activity. Just an FYI but go off and try whatever speaks to you!
Carly H
Georgia girl living in the mountains of Colorado! This was my first loaf of bread and it came out amazing, even at high altitude!! I feel so proud. 🙂 Can't wait to try more of your recipes!
Katie F.
Hi there!! I’ve made this bread a bunch of times before however I was only using 8 ounces of water instead of 12 (reading is fun, LOL) Anyway, now that I’m following the recipe the past three times I’ve made it, the dough is very sticky, to the point where I have to scrape my hands! I heat the water until it’s about 100 degrees. I’m not sure what I’m doing wrong! Have you encountered this?
lilyloutay
It could be that you need to add some more flour to make it more solidified! Add just a little bit of flour at a time and knead for a few minutes before you add more. See if that helps!
Melissa P
This is my second time making this bread. My 5 yr old helped me and wow! It never disappoints. I'm so glad I found you on Instagram. I look forward to your content and the next recipe I'm going to attempt is the Chocolate Meringue Pie!
Christine
This is amazing! I make it at least once a week. Thank you!!! Can I make this with cinnamon and raisins???
lilyloutay
Absolutely!
Kathryn
Mine turned out fabulous, except the bottom burned a bit. My family ate it up after I cut the bottom off. Any thoughts why?? I used a 7 quart dutch oven and put it on parchment paper while it was baking. Any thoughts why and what to avoid next time. Thanks so much! 🥰
lilyloutay
It could be that your oven has uneven heat distribution. Some ovens have hot spots or uneven heat distribution, leading to one area of the oven being hotter than another. Consider rotating the Dutch oven halfway through baking to ensure even browning.