Homemade Water Bagels
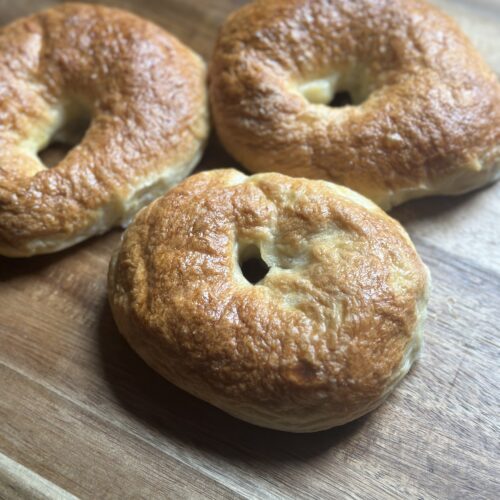
This has got to be one of the easiest and most enjoyable recipes I've made to date! It's like having a bakery in your home. These bagels were so delicious and this recipes gives you enough bagels for about half a dozen of 'em!
These bagels are great for any and all times of the day; you can make a delicious breakfast or sandwich out of them.
This was inspired by my made-from-scratch bread recipes on this site, and pairs well with cream cheese, butter, or my Homemade Orange Jam.
Ingredients Overview
*See recipe card for quantities*
Bagel Dough
- warm water
- active dry yeast or quick rise yeast (for this recipe, I used quick rise yeast)
- cane sugar
- all-purpose flour
- salt
Egg Wash
- egg
- water
Instructions Overview
Here's what the process will look like!

Combine dough ingredients and mix to create dough.

Divide dough into rolls, let rise, create bagel shapes, then rise again.

Transfer bagel dough to boiling water, heating each side for ~2 minutes.

Remove and cover with egg wash before placing in oven at 350 Fahrenheit for 25-30 minutes.
Hint: Place salt or other seasoning atop the bagels after egg wash so the bagels absorb some of the flavor while baking in the oven!
Substitutions
- Gluten Free - use gluten free flour instead of regular all-purpose flour to make these gluten free. Ratio is usually 1:1.
-
Yeast - I used quick rise yeast so that I could make these faster. However, if you have active dry yeast, that will work too, but will add another 1-2 hours of rising time.
- You'll want to follow the same steps in my recipe except for the following:
- 1) make sure to proof your active dry yeast (in step 1) and make sure you see the top of the mixture frothing in that 5-10 minute range to ensure your yeast is properly activated before adding into the dough mixture.
- 2) before cutting the dough into even parts (step 4), you're going to cover your dough and place in a warm area to let the dough rise. You want it to double in size or expand for 1-1.5 hours. Once you've done that, you can then divide your dough into evenly sized parts and proceed with the reminder of the recipe.
- You'll want to follow the same steps in my recipe except for the following:
Variations
-
Flavor - if you want to add some flavor to your eggs, you're welcome to add toppings before putting in the oven for baking. Below are some recommended ways to satisfy your taste buds:
- Savory - add some shredded cheddar cheese, jalapeños, and/or onion seasoning to the surface of your bagel.
- Sweet - add some blueberries or chocolate chips to your bagel dough when combining ingredients together.
Equipment
- KitchenAid Standing Mixer - I love my Standing Mixer (her name is Stella). But if you don't have one, you can always try this recipe by hand. It may take a little longer to fully combine your dough ingredients, but it is doable.
- 2 Small Mixing Bowls
- 1 Cutting Knife
- 1 Kitchen Towel Rag
- 1 Large Stove Pot
- 1 Slotted Spoon or Slotted Spatula
- 1 Basting Brush
- Baking Sheet
- Parchment Paper
Storage
- Cooling: Allow the homemade water bagels to cool completely after baking. Transfer them to a wire rack to cool, which allows air to circulate around the bagels.
- Room Temperature: If you plan to consume the bagels within 1-2 days, you can store them at room temperature. Place the cooled bagels in a paper bag or bread box to help maintain their texture. Avoid storing them in plastic bags, as this can trap moisture and make the bagels soggy.
- Refrigeration: For longer-term storage, it's best to refrigerate the bagels. Place the cooled bagels in a resealable plastic bag or an airtight container and refrigerate for up to 5-7 days. Refrigeration helps to slow down the staling process and keeps the bagels fresh.
- Freezing: If you want to store the bagels for an extended period, you can freeze them. Wrap each cooled bagel individually in plastic wrap or aluminum foil to prevent freezer burn. Then, place the wrapped bagels in a freezer-safe bag or container. Frozen bagels can last for up to 3 months.
- Thawing: When you're ready to enjoy the bagels, remove them from the refrigerator or freezer and let them thaw at room temperature. Once thawed, you can reheat the bagels in a toaster oven or conventional oven to refresh them.
- Slicing Before Freezing (Optional): If you prefer, you can slice the bagels before freezing them. This makes it easier to thaw and reheat individual portions as needed.
Homemade Water Bagels
6 bagels
45 minutes
30 minutes
Bread
Hole in one for this recipe 😉
Ingredients
blank
- 1 cup warm water 100-110℉
- 1 tablespoon quick rise yeast
- 1 tablespoon cane sugar
- 2½ cups all-purpose flour
- 1 teaspoon salt
blank
- 1 large egg
- 1 tablespoon water
- 1 teaspoon salt to go over egg wash, not mixed in
Directions
In a small mixing bowl, combine your warm water, quick rise yeast, and cane sugar. Stir until well combined and set aside for 5-10 minutes.
Grab your KitchenAid Stand Mixer (or a large mixing bowl if you don't have a KitchenAid), and add your flour, salt, and small mixing bowl contents.
Attach your dough hook to your KitchenAid and mix on medium speed for about 5 minutes or until you get a homogenous looking dough. NOTE: If you don't have a KitchenAid mixer, you can mix everything by hand and knead. It will take longer than the KitchenAid mixer, but keep working the dough until all ingredients are very well combined and you have a consistent dough.
Remove dough from mixing bowl and set on flat surface. Grab a cutting knife and cut the dough into six evenly sized parts.
Using your hands, roll each portion of dough into individual balls and set back on flat surface. Grab your towel rag and cover the balls for about 15 minutes to rise.
After 15 minutes, remove your towel rag and create a bagel shape from your balls. Gently press a hole into the middle of each ball and evenly distribute the dough surrounding it so you get a nice lookin' bagel.
Lay the bagels flat on a surface again and cover with towel rag for another 15 minutes for a second rise.
During the second rise, fill a large stove pot with water - about halfway to the top of the pot. Set on stove on medium-high heat; you want your water to boil before doing anything with the bagels.
While waiting for the water to boil, line your baking sheet with parchment paper and keep near your stove pot.
Once you see a consistent boil of water and the second rise is done, place each bagel ring into the boiling pot of water. NOTE: Depending on the width of your pot, you may be able to add 2 in at a time, but try to avoid having your bagels touch when boiling.
Boil bagels for about 2 minutes each side. Use your slatted spoon/spatula to turn the bagels. After each side has had a chance to boil, remove with slatted spoon/spatula and hold over the pot. Let any excessive water filter through slatted spoon/spatula for a couple seconds, then transfer bagel to lined baking sheet. The bagels should look like they have very small crevices and a slightly bumpy surface after boiling.
In a small mixing bowl, combine egg wash ingredients and using a Basting Brush, brush egg wash across bagel surfaces.
Very lightly sprinkle some salt across the bagel surfaces as well.
Place the bagels in the oven at 350℉ for about 25-30 minutes or until outsides are golden brown.
Once done, remove and let cool. Enjoy!!